Introduction: Why Your Xfinity Gateway Setup Matters
Imagine unpacking your new Xfinity Gateway, plugging it in, and—just like magic—your home splits into a web of strong, fast Wi-Fi. You stream, work, and game without buffering or dropouts. But in real life, getting there sometimes takes a bit of trial and error.
Getting the Xfinity Gateway up and running correctly matters more than many people think. A misstep in configuration, placement, or activation can lead to slow speeds, coverage gaps, or connectivity issues. In this guide, I’ll walk you through the exact steps I use (and recommend) to install, activate, troubleshoot, and optimize your gateway. No fluff. Just clear, tested steps and tips you probably won’t see in generic how-tos.
Let’s get your network humming.
1. What Is the Xfinity Gateway — Quick Overview
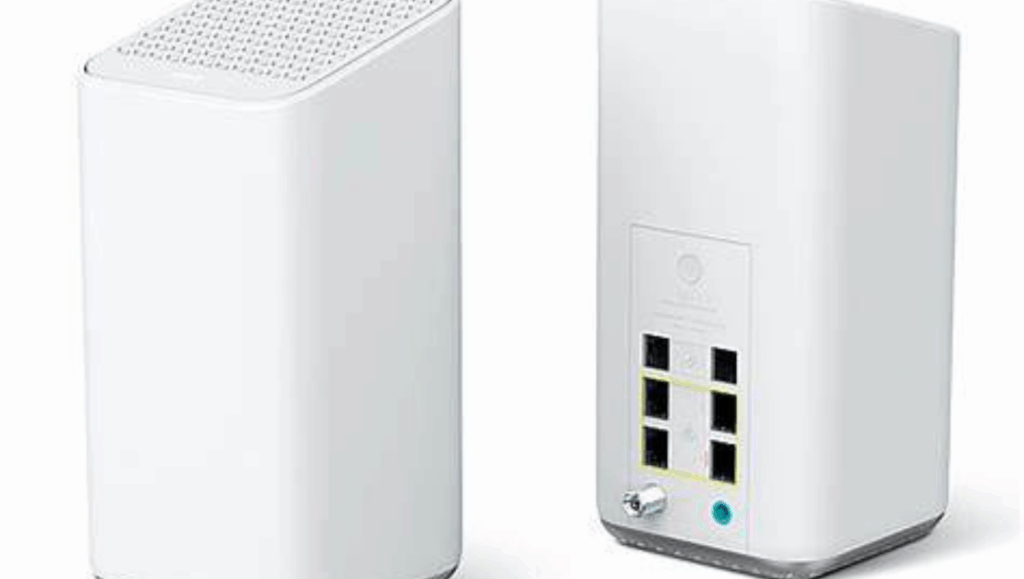
Before diving into steps, here’s a quick refresher: the Xfinity Gateway is a modem + router in one device (sometimes called a “gateway”). Xfinity often refers to these units as “xFi Gateways.” They handle coaxial signals (from your provider) and broadcast Wi-Fi to your devices. (Xfinity)
Because everything’s built into one device, configuration and activation are critical: from power sequencing to firmware, all must align.
2. Preparing Before Setup: Gathering Materials & Choosing the Spot
What You’ll Need
- Xfinity Gateway (new or replacement)
- Power adapter (comes with the unit)
- Coaxial cable (one end threaded, usually included)
- Ethernet cable (optional, for wired connection)
- Xfinity account credentials (username/password)
- Mobile device or a laptop to complete activation
Best Practices for Placement & Setup Spot
Where you place the gateway will influence your Wi-Fi reach dramatically. Based on guides like Updater’s self-install instructions: (Updater)
Do:
- Choose a central, elevated location (open shelf, side table)
- Ensure it’s away from heavy appliances (microwaves, refrigerators)
- Keep it off the floor and not tucked behind furniture or walls
- Avoid stacking other electronics or metal near it (interference risk)
Don’t:
- Place it inside a closed cabinet or behind large metal objects
- Put it close to speakers or electronics that emit interference
- Use an outlet controlled by a dimmer or switch (power instability) (communityforums.rogers.com)
Also, think about where coax lines come into your home and where any wired devices (TVs, PCs) will live. That helps choose a location minimizing long cable runs.
3. Physical Connection: Hooking Up Your Gateway
Follow this sequence carefully — it ensures signals stabilize properly and avoids common errors:
- Coax Connection First
Take the coaxial cable and screw it to the gateway’s coax port. The other end goes into your wall’s cable outlet. Hand-tighten — do not overtighten with tools. (Updater) - Power It Up
Connect the power cable to the gateway first, then plug it into your wall. This order reduces the risk of electric feedback and helps the device boot cleanly. (Updater) - Allow It to Boot
The gateway may take up to 20 minutes for its first boot, firmware updates, and signal sync. You’ll know it’s ready when the LED status becomes solid or stable (often white) for about 60 seconds. (Updater) - Optional: Wired Device
If you have a PC, smart TV, or gaming console, connecting it via Ethernet now gives a stable path and simplifies the next steps—no jumping between networks.
4. Activation: Bringing the Gateway to Life
Once your hardware is ready, the activation process links your physical gateway to your Xfinity account so you can use it as your primary network device.
Method A: Using the Xfinity App (Preferred)
- Launch or install the Xfinity app.
- Log in with your Xfinity ID/password.
- Tap “Get Started” under activation.
- The app will prompt you to scan a QR code (found on the gateway) or enter the device’s MAC or serial number. (Xfinity)
- Follow on-screen steps: verifying your account, naming your Wi-Fi network, and setting a password.
- The system will test the connection and complete. Typical activation time: ~10–20 minutes. (Xfinity Community Forum)
Method B: Browser Activation (No App Required)
- Connect via Wi-Fi (using the default SSID printed on the gateway) or plug in Ethernet.
- In your browser, navigate to xfinity.com/activate or the custom activation link. Some users also refer to comca.st/3uPTX4t when redirect fails. (Reddit)
- Follow onscreen instructions: verify account, choose Wi-Fi name & password, etc.
- Wait as the gateway reboots and finalizes setup.
Tip: If activation stalls or errors, reboot the gateway and start again. Also, contacting Xfinity support or using their community forums often helps with stuck installations. (Xfinity Community Forum)
Once done, your gateway should be active and broadcasting your new Wi-Fi network.
5. Connecting Devices & Testing
Via Wi-Fi
- On your device, open Wi-Fi settings.
- Select the SSID you created during setup.
- Enter your password exactly (case-sensitive).
- Your devices should connect and automatically gain internet access.
Via Ethernet
- Plug one end of an Ethernet cable into the gateway’s LAN port.
- Plug the other end into your PC, console, or smart device.
- This bypasses Wi-Fi entirely and gives you a direct, stable connection.
Testing Your Connection
- Use Xfinity’s built-in speed test (e.g.
speedtest.xfinity.com) to verify your performance. (Updater) - Test upload, download, and latency.
If speeds are lower than expected, don’t panic. Read the next section.
6. Common Setup Issues & Fixes
Even when following the steps, issues may arise. Here are some common ones I’ve encountered (in my own home and in support forums) — along with suggestions.
| Problem | Possible Cause | Fix / Workaround |
|---|---|---|
| Activation stuck or fails | Signal issues or a bad coax line | Try another coax outlet, reboot, or contact Xfinity support |
| LED blinking orange/green long | Firmware update in progress | Wait at least 20 min, don’t unplug |
| Wi-Fi is weak in certain rooms | Gateway placed suboptimally | Use bridge mode on the gateway so it acts only as a modem (reduces double NAT) (Xfinity Community Forum) |
| Double NAT when using personal router | Gateway and router both routing | Double NAT when using a personal router |
| Can’t access admin settings | Locked firmware or lack of permissions | Use direct Ethernet, or tap “Admin Tool” address (10.0.0.1, etc) (Reddit) |
Personal Tip: I once had a unit that would never activate via the app. Switching to browser activation fixed it immediately. Also, keeping spare coax cables helps when the supplied one underperforms.
7. Final Tweaks & Optimization
Once your gateway is live and devices are connected, a few final touches help get the most from your setup.
Change SSID & Password
Don’t keep default labels. Use something memorable but not personal (avoid names like “John’s WiFi”). Use a strong password with letters, numbers, and symbols.
Enable Advanced Security & Updates
Xfinity Gateways often include “xFi Advanced Security” to block threats. Activate it from your dashboard or app. Also, firmware updates may run automatically, but occasionally check settings to see if anything is pending. (Xfinity)
Monitor Devices & Limit Bandwidth Hogs
Within the Xfinity app, you can see connected devices. If a single device (like a streaming box) is eating bandwidth, you may prioritize or limit it using QoS (Quality of Service) features (if available in your gateway model).
Expand Coverage if Needed
If some areas suffer from weak Wi-Fi:
- Consider using Xfinity Wi-Fi Boost Pods (mesh nodes) that extend your network.
- Or place a secondary access point using wired backhaul.
- Just be cautious of double NAT: ensure proper bridging if you combine multiple routers. (Xfinity Community Forum)
8. Why Getting the Setup Right Pays Off
– Better stability: a well-configured gateway remains solid for days, weeks, or months without needing reboots
– True coverage: proper placement avoids dead zones and improves signal across rooms
– Security: correct firmware and firewall settings to reduce exposure to attacks
– Flexibility: bridging/advanced modes allow you to add your own routers or devices later
When I set up my own home network, I originally placed the gateway in a corner behind furniture. Speeds suffered upstairs. After relocating and reactivating with the browser method, upload and download moved from 60% of the plan to nearly full capacity.
9. Conclusion & Next Steps
You now have a clear, battle-tested path to setting up your Xfinity Gateway: from placement to activation to optimization. While the process might take 15–20 minutes, a single misstep can cost you hours of frustration.
If you run into an issue—like the gateway refusing activation, speed below expected, or strange network behavior—revisit the common issues and fixes above.
Call to Action
If this guide helped you, share your setup story below—let me know which activation method worked best or a problem you overcame. Want help comparing gateway models, choosing mesh Wi-Fi expansions, or optimizing firmware settings? Check out my related post on Xfinity Gateway vs Standalone Router, or drop a comment, and I’ll write it next. Happy networking!